


DIY Unique Christmas Ornaments
This is the season for gathering around the tree! Buying your Christmas decorations might be convenient, but when decorating the most festive Christmas tree for your home, everyone knows that homemade Christmas ornaments are the best way to ensure a tree full of holiday cheer. Getting crafty by creating homemade Christmas ornaments is a fun project that the whole family can do together - even little kids can be included in the project. And don't be afraid to put your own spin on these handmade Christmas ornaments. The more personalized they are, the better. Soon enough, they will become some of your family's favorite pieces to put on the tree each year.
From year to year, when you decorate the Christmas tree with your family, you will remember each piece individually and how you made it.
If we say that the do-it-yourself variant is cheaper and increasingly popular in the world, then it can be said that you will be in trend!
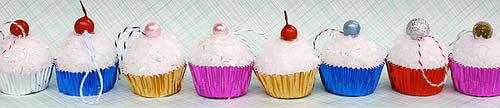
Styrofoam Ball Cupcakes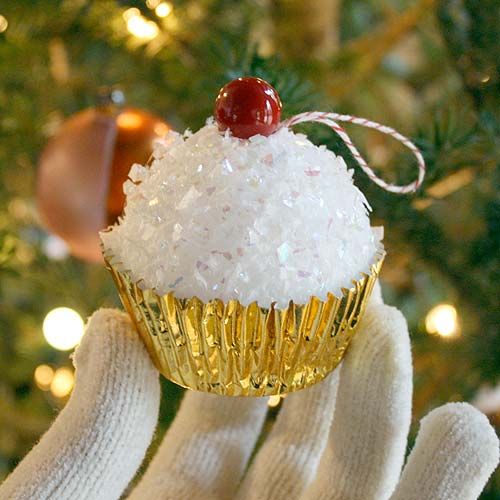
These beautiful Styrofoam Ball Cupcakes also make thoughtful DIY Christmas gifts if you require a few. Plus, you don't need to be a pastry chef to whip up a batch of these tempting treats for the eyes. The best part? They are 100% calorie-free, so you can indulge to your heart's content.
Things you need:
- 2 1/2″ Styrofoam Balls
- Heavy-duty foil cupcake liners
- Iridescent White Soft Snowflakes
- Berry Spray (color of your choice)
- Craft Glue
- Paint Brush or Foam Sponge Brush
- Hot Glue Gun and Glue Sticks
- Scissors
- Ribbon or decorative string for hanging
- Skewers or Dowel Rods

Things to do:
Step 1: Press a dowel rod into each Styrofoam ball, and coat a little more than half of the top of the ball with a generous layer of craft glue.
Step 2: Roll the glue-coated Styrofoam ball in a shallow pan filled with artificial snowflakes, then use your fingers to press the flakes securely to the surface. Tap gently to remove excess flakes, and prop a coffee can or mug to dry. Try to wait patiently because if you try to glue liners on before the styrofoam balls dry, the sides won't stick. If you have little hands to help you with this project… they will LOVE this step!
Step 3: After glue sets and dries, add a generous dollop of hot glue to the bottom and the top inside each foil cupcake liner and press the Styrofoam ball in firmly. Be sure to carefully press the sides of the foil - so the liner is tightly glued on. Also, remember that you may not want to push the styrofoam ball down too far, or the bottom will curve, and your cupcake will not sit flat (not a big deal if you plan to hang them, though). If you have little hands to help you with this project… be sure to only have big kids or adults handle the hot glue step.
Step 4: Snip the berries from the branch, leaving about an inch of stem, and cut lengths of ribbon or decorative thread for hanging. Add a dollop of hot glue to the top of each Styrofoam ball, pressing the tails of the ribbon (if you want to hang your cup and berry into the Styrofoam. You can also flip your cherry around with the step showing upwards to make it look like a cherry stem! Allow drying thoroughly before displaying.
These Styrofoam Ball Cupcakes are also perfect for adding a unique, super adorable, and sweet decorative touch to the wedding reception, birthday party, baby shower, or bridal bash. You can create a mouth-watering centerpiece by dangling these charming decorations from a tabletop ornament tree or make a sweet bouquet by inserting dowel rods into the bottom and displaying them in a festive vase. While you are at it, make an extra baker's dozen to share with family and friends.

DIY Christmas Ornaments Ideas
A Palm Print Like Santa Claus
Print a child's palm painted white on the cardboard. Cut the red collage paper into a triangle shape and paste it over your fingerprint. Next, cut cardboard around the entire print of the hand and hat together. Finally, cut a small circle out of cardboard and glue it like a nose. The unique and personalized decoration is ready to decorate the Christmas tree or as a New Year's gift!
New Year's Family of Cardboard Rolls
With a few lovely details and a couple of cardboard rolls, make Snowman, reindeer, Santa Claus, and elves ... Paint the base, and with the help of various details, turn each into a different character. Then, you can display them together or hang them on a Christmas tree using tape.
Cardboard stars
Cut the cardboard into a star shape. Do the same with green paper or material. First, stick a green background on the cardboard base, and then colorful buttons on it. Finally, drill a hole through which you will pass the ribbon and hang a colorful star on the Christmas tree. You can make other shapes in the same way! It is essential to be colorful!
Personalized Decorations
Cut circles out of cardboard and glue ears and horns like reindeer. Make sure to make a hook for hanging decorations. After choosing the appropriate photos of the children, cut them out, paste them on the prepared round decorations, and finally decorate them with a red nose.
Christmas decorations can be made of cardboard, paper, textiles, and natural materials! All you need is your imagination and a festive mood!
There are many ways to design unique decorations for your Christmas tree! Whatever they are, they will surely be the most beautiful for your family, which is most important! An ideal opportunity to gather and hang out with family and prepare for the upcoming holidays!
Aren’t these DIY Christmas Ornaments fun!? Do they get you in a festive mood? I hope you love making them!
Complementary Smarty Disposable Party Plasticware:
- Plastic Mini Flatware
- Disposable Plastic Scoops
- Plastic Serving Flatware
- Modern Plastic Tea Spoons
- Disposable Stemware Collection
- Disposable Charger Plates
- Plastic Party Barware
- Disposable Plastic Forks
- Disposable Plastic Serving Forks
- Chic Plastic Mini Bowls
- Disposable Party Dinnerware Sets
- Disposable Ecoware
- Champagne Flutes
- Disposable Flatware Sets
- Beautiful Plastic Coffee Mugs
- Disposable Plastic Silverware
- Disposable Wedding Drinkware
- Elegant Wine Glasses


